Introduction to Command Line
Welcome to the UKRI Digital Research Skills Catalyst introductory guide to the command line!
This short 90 minute tutorial will provide the basics of everything you need to know to start using the command line, including:
What is a file system?
What is the shell?
How can I use the shell commands to navigate the file system?
How can I use the shell commands to use software and manipulate data?
Before we begin there is a brief setup required, as detailed below:
Getting started
The first thing we need to do is set up our working files on your computer.
1. Download and unzip the course folder
📂Click here to download the zipped course folder.
Download the provided course folder to your computer. This folder contains all the files and directories you will need for the exercises.
Once downloaded:
Locate the file (usually in your Downloads folder)
Right-click and select Extract All (Windows) or double-click to unzip (Mac)
Choose a suitable location (we recommend your Desktop for easy access)
After extracting, you should see a folder containing several subfolders and files.
2. Open your command line interface
Next, open the command line (also known as the terminal or shell) and navigate to your extracted folder.
Windows users:
Open the folder in File Explorer
Right-click inside the folder
Select Git Bash Here (or open Command Prompt/PowerShell and navigate using
cd)
Mac users:
Open Terminal
Type
cd(with a space after it)Drag and drop the extracted folder into the Terminal window
Press Enter
You should now be working inside your course directory. Let’s begin!
Part One: What is a file system?
A file system is exactly what it sounds like - a way for your computer to store your data in an organised way using files.
You will definitely have come across files before. All the data stored on your computer is split into separate files, making it much easier to keep track of than if it was all in one big blob.
There are lots of different file types; we can often find out something about what kind of data a file contains by looking at its filename extension. For example:
.txt tells us that the file contains text
.exe tells us that the file contains a program to be run
.html tells us that the file contains a webpage, and should be run inside a web browser
We will come across various different file types during this course, some of which you may not have seen before. Do not worry. We will introduce them to you and explain how to use them when necessary.
In a file system, files are organised into directories, which can also be called folders. Hopefully you will have used folders to organise your files before! Folders can contain sub-folders, which can contain their own sub-folders, and so on almost without limit.
It is easiest to picture a file system, or part of it, as a tree that starts at a directory and branches out from there. This is called a hierarchical structure. The figure below shows an example of a hierarchical file structure that starts at the “home directory” of the user named user1:
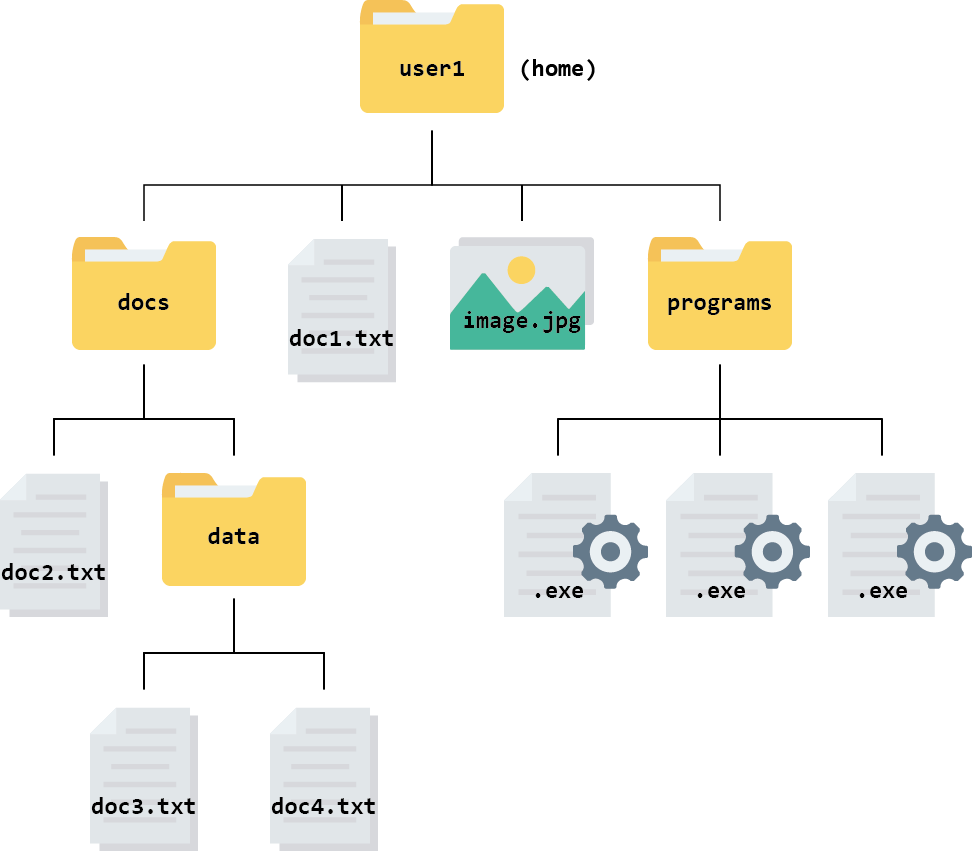
The directory you are working inside is called your working directory. For example, if you were editing doc2.txt in the diagram above, your working directory would be the folder called docs.
Think about your own computer and how your files and directories are organised. Sketch a tree diagram like the one above for your file system.
Hint: remind yourself of your file system’s layout using a file manager application such as:
| OS | Icon |
|---|---|
| File Explorer (Windows) | |
| Finder (Mac) |
You probably already use these applications regularly to find, open and organise files.
File paths
It is not practical to draw out a tree diagram every time we want to refer to a file’s location. Instead, we can represent the information as a file path.
In a file path, each directory is represented as a separate component separated by a character such as \ or /. It is like writing an address or set of instructions for someone to follow if they want to find a specific file.
For example, the path for the file called doc3.txt in the file system above looks like this: user1/docs/data/doc3.txt in a Unix or Linux computer.
It is useful to note that Windows uses backslashes (\) to separate path components, while Unix, Linux and Mac use forward slashes (/).
Root and home directories
The root is the top-level of directories, which contains all other directories further down the tree.
The root is represented as a / in Unix, Linux, and Mac operating systems.
In the Windows operating system, the root directory is also known as a drive. In most cases, this will be the C:\ drive.
Even though the root directory is at the base of the file tree (or the top, depending on how you view it), it is not necessarily where our journey through the file system starts when we launch a new session on our computer. Instead our journey begins in the so called “home directory”.
In Windows, Mac, Unix, and Linux, the “home directory” is a folder named with your username. Your personal files and directories can be found inside this folder. This is where your computer assumes you want to start when you open your file manager.
On Windows and Mac your home directory is a directory inside directory called Users and named with your username. On Unix/Linux systems it is called home.
From the root, the file system is:
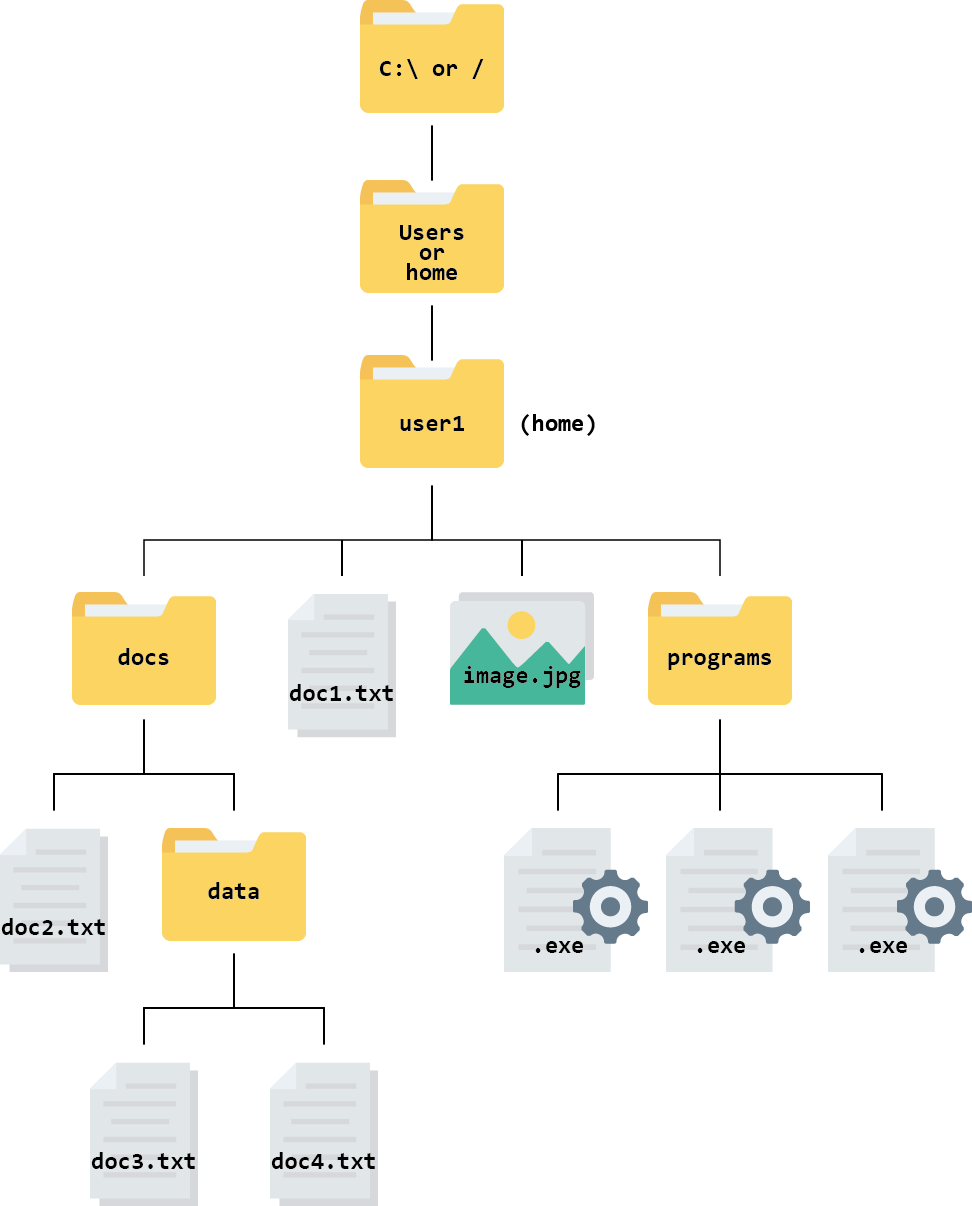
Your home directory is:
C:\Users\user1\on Windows/Users/user1/on Mac/home/user1/on Linux
In Linux (the operating system we will use later in the course), a tilde symbol (~) is used as a shortcut for your home directory. So, for example, the path ~/docs/doc2.txt is equivalent to /home/user1/docs/doc2.txt.
Absolute vs relative paths
There are two ways of writing a file path - absolute paths and relative paths.
An absolute path contains the complete list of directories needed to locate a file on your computer. This allows you to reach the file no matter where you are.
A relative path describes the location of a file relative to your current working directory. For example, if you were already in the folder called docs, the relative path for doc3.txt would be data/doc3.txt. There is no need to give instructions to navigate a route you have already taken.
If, however, you were in the folder called docs and you wanted to open one of the .exe files, you would need to give the path to .exe relative to the docs folder or give the absolute path.
Use the file system above to answer these questions.
- What is the absolute path for the document
doc4.txton a Linux computer? - Assuming you are currently in the directory called
docs, what is the relative path for the documentdoc2.txt?
- The absolute path is
/home/user1/docs/data/doc4.txtor~/docs/data/doc4.txt. - The relative path is
doc2.txt(as you are already in the directory wheredoc2.txtis stored).
Part Two: What is a shell and why should I care?
A shell is a computer program that has a command line where you type commands to do things on your computer rather than using menus and buttons on a Graphical User Interface (GUI).
There are many reasons to learn how to use the shell/command line:
- Software access - many bioinformatics tools can only be used through a command line interface, or have extra capabilities in the command line version that are not available in the GUI (this is true of most of the software used in this course).
- Cloud access - bioinformatics tasks which require large amounts of computing power (like the ones we’ll do later in this course!) are best performed on remote computers or cloud computing platforms, which are accessed via a shell.
- Automation - repetitive tasks (e.g. doing the same set of tasks on a large number of files) can be easily automated in the shell, saving you time and preventing human error.
- Reproducibility - when using the shell your computer keeps a record of every step that you’ve carried out, which you can use to re-do your work when you need to.
In this lesson you will learn how to use the command line interface to move around in your file system.
How to access the shell
To recap how to access your shell:
Windows users:
- Right click anywhere inside the blank space of the file manager, then select Git Bash Here. A new window will open - this is your command line interface, also known as the shell or the terminal. It will automatically open with your
ybcmddirectory as the working directory.
- Right click anywhere inside the blank space of the file manager, then select Git Bash Here. A new window will open - this is your command line interface, also known as the shell or the terminal. It will automatically open with your
Mac users, you have two options:
EITHER: Open Terminal in one window and type
cdfollowed by a space. Do not press enter! Now open Finder in another window. Drag and drop theybcmdfolder from the Finder to the Terminal. You should see the file path leading to yourybcmdfolder appear. Now press enter to navigate to the folder.OR: Open Terminal and type
cdfollowed by the absolute path that leads to yourybcmdfolder. Press enter.
Challenge
Use the -l option for the ls command to display more information for each item in the directory. What is one piece of additional information this long format gives you that you don’t see with the bare ls command?
Code
ls -lOutput
total 0
drwxr-xr-x 1 ITSYORK+jpm513 4096 0 Mar 30 09:30 data/
drwxr-xr-x 1 ITSYORK+jpm513 4096 0 Mar 30 09:30 databases/
The additional information given includes the name of the owner of the file, when the file was last modified, and whether the current user has permission to read and write to the file.
No one can possibly learn all of these arguments - that’s what the manual page is for! It does take practice to get used to using and understanding the information in the manual. Often, you don’t need to understand completely what it is saying to be able to guess what to try.
Let’s go into the data directory and see what is in there using the cd and ls commands.
Code
cd data
ls -F
Output
illumina_fastq/ nano_fastq/This directory contains two subdirectories. We can tell they are directories and not files because of the trailing ‘/’. They contain all of the raw data we will need for the rest of the course.
For now, let’s have a look in illumina_fastq. We can do this without changing directories using the ls command followed by the name of the directory.
Code
ls illumina_fastqOutput
ERR4998593_1.fastq ERR4998593_2.fastqThis directory contains two files with .fastq extensions. FASTQ is a format for storing information about sequencing reads and their quality. We will be learning more about FASTQ files in a later lesson.
Let’s also have a look in the nano_fastq directory.
Code
ls nano_fastqOutput
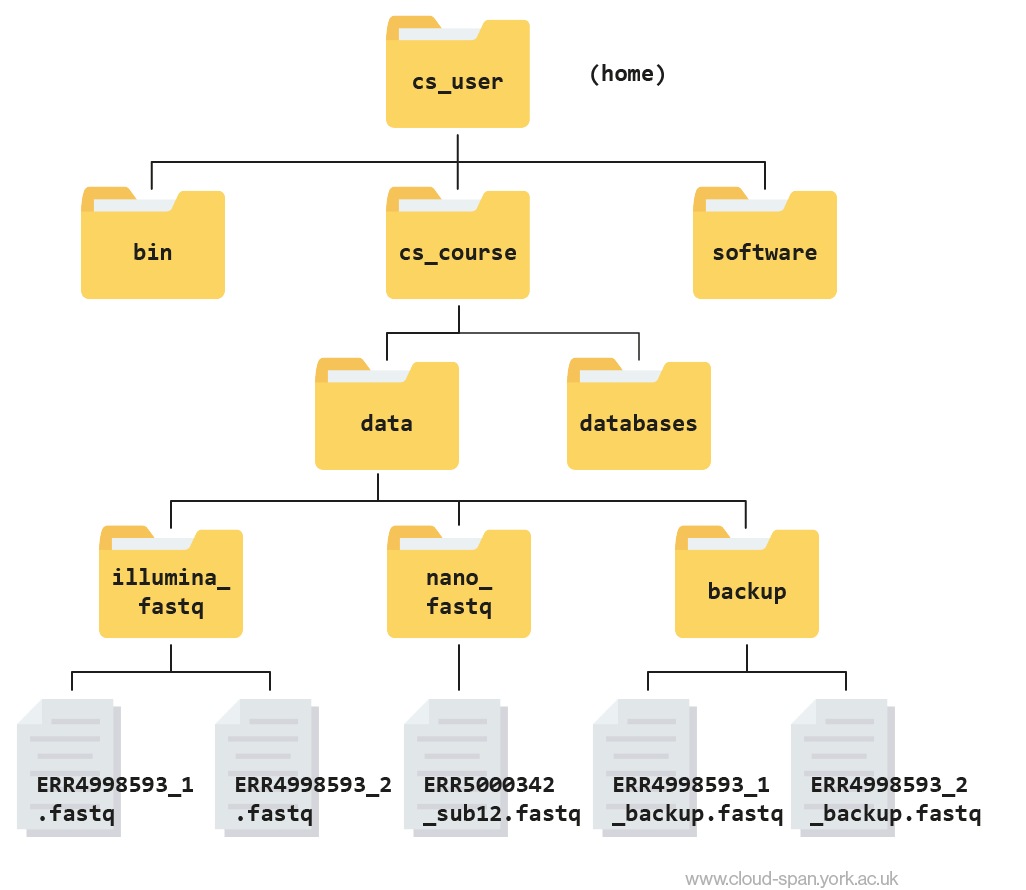
ERR5000342_sub12.fastqLearning to navigate a new file directory can be confusing at first. To help, here is a tree diagram showing what we have explored so far.
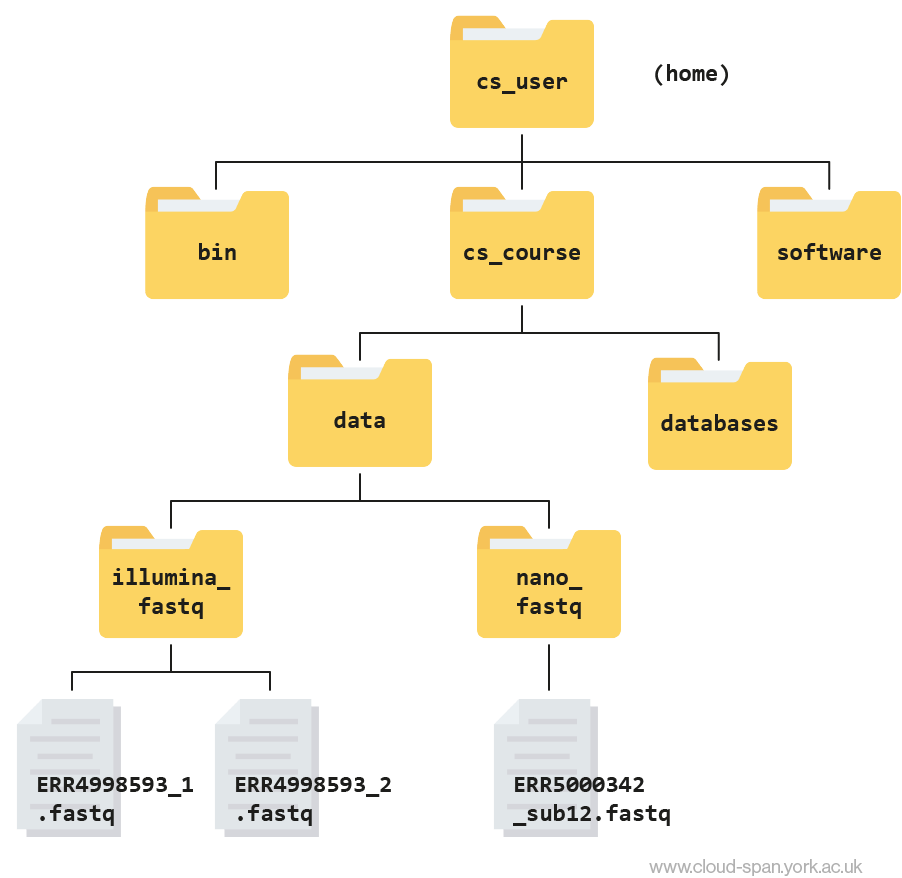
First we moved from our home directory at csuser into the cs_course directory, which is one level down. From there we opened up the data directory, which contains subdirectories - illumina_fastq and nano_fastq. We had a peek inside both of these directories and found that illumina_fastq contained two files, while nano_fastq contained one.
Shortcut: Tab Completion
It is very easy to make mistakes typing our filenames and commands. Thankfully, “tab completion” can help us! When you start typing out the name of a directory or file, then hit the tab key, the shell will try to fill in the rest of the directory or file name.
First of all, typing cd after the prompt and pressing enter will always take you back to your home directory. Let’s do this:
Code
cdthen type:
Code
cd Desktop/ybcmd/then type:
Code
cd csand press tab.
The shell will fill in the rest of the directory name for cs_course. Press enter to execute the command and move directories.
Now change directories again to data.
Code
cd dataAnd again into illumina_fastq.
Code
cd illumina_fastqUsing tab complete can be very helpful. However, it will only autocomplete a file or directory name if you’ve typed enough characters to provide a unique identifier for the file or directory you are trying to access.
For example, if we now try to list the files in illumina_fastq with names starting with ERR by using tab complete:
Code
ls ERR<tab>The shell auto-completes your command to ERR4998593_, because all file names in the directory begin with this prefix. When you hit tabagain, the shell will list the possible choices.
Output
ERR4998593_1.fastq ERR4998593_2.fastqTab completion can also fill in the names of programs, which can be useful if you remember the beginning of a program name.
Code
pw<tab><tab>Output
pwck pwconv pwd pwdx pwunconvDisplays the name of every program that starts with pw.
You might find it useful to keep a note of the commands you learn in this course, so you can easily remember them in future. This will be faster than scrolling through the course each time you forget a command. While using your Cloud-SPAN AWS instance you can also type csguide into the command prompt and hit enter for a text-based guide to the command line, including frequently used commands.
Moving around the file system
Now we’re going to learn some additional commands for moving around within our file system.
Use the commands we’ve learned so far to navigate to the illumina_fastq directory from our home:
Code
cd
cd Desktop
cd ybcmd
cd cs_course
cd data
cd illumina_fastq
What if we want to move back up and out of this directory and to our top level directory? Can we type cd data? Try it and see what happens.
Code
cd dataOutput
-bash: cd: shell_data: No such file or directoryYour computer looked for a directory or file called data within the directory you were already in. It didn’t know you wanted to look at a directory level above the one you were located in.
We have a special command to tell the computer to move us back or up one directory level.
Code
cd ..Now we can use pwd to make sure that we are in the directory we intended to navigate to, and ls to check that the contents of the directory are correct.
Code
pwdOutput
/c/Users/jpm513/Desktop/ybcmd/cs_course/dataCode
lsOutput
illumina_fastq/ nano_fastq/From this output, we can see that .. did indeed take us back one level in our file system, to data.
You can chain these together like so:
Code
ls ../../Output
bin cs_course software This prints the contents of the folder called csuser (our home folder).
Examining the contents of other directories
In the above section we learned how to use pwd to find our current location within our file system. We also learned how to use cd to change locations and ls to list the contents of a directory.
By default, the ls commands lists the contents of the working directory (i.e. the directory you are in). You can always find the directory you are in using the pwd command. However, you can also give ls the names of other directories to view. Navigate to your home directory if you are not already there.
Code
cd
cd Desktop/ybcmd/
Then enter the command:
Code
ls cs_courseOutput
data/ databases/This will list the contents of the cs_course directory without you needing to navigate there.
The cd command works in a similar way.
Try entering:
Code
cd
cd ~/Desktop/ybcmd/cs_course/data/
This will take you to the data directory without having to go through the intermediate cs_course directory.
Full vs. Relative Paths
The cd command takes an argument which is a directory name. Directories can be specified using either a relative path or a full absolute path. The directories on the computer are arranged into a hierarchy. The full path tells you where a directory is in that hierarchy. Navigate to the home directory, then enter the pwd command.
Code
cd
pwd
You will see:
Output
/c/Users/jpm513This is the full name of your home directory. This tells you that you are in a directory called the same as your username, which sits inside a directory called Users which sits inside the very top directory in the hierarchy. The very top of the hierarchy is a directory called C which is usually referred to as the root directory.
Now enter the following command:
Code
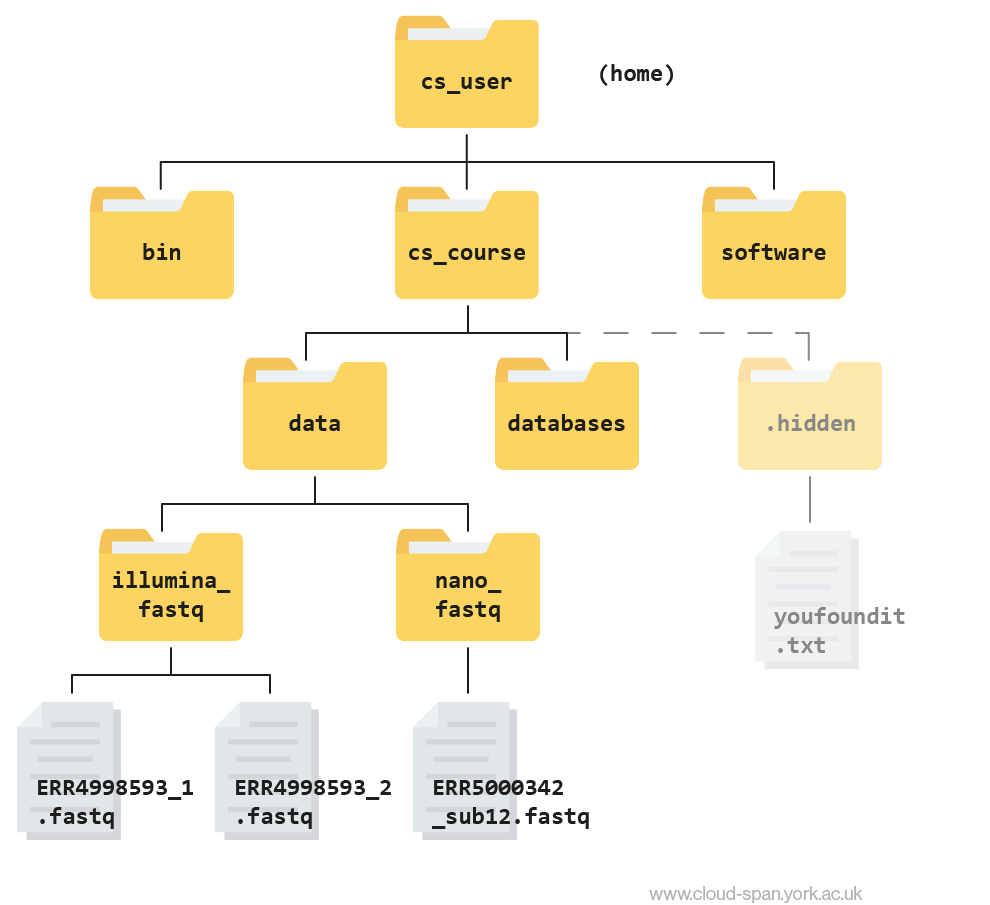
cd ~/Desktop/ybcmd/cs_course/.hiddenThis jumps forward multiple levels to the .hidden directory. Now go back to the home directory.
Code
cdYou can also navigate to the .hidden directory using:
Code
cd Desktop/ybcmd/cs_course/.hiddenThese two commands have the same effect - they both take us to the .hidden directory. The first uses the absolute path, giving the full address from the root directory /. The second uses a relative path, giving only the address from the working directory. A absolute (full) path always starts with a /. A relative path does not.
You can usually use either a full path or a relative path depending on what is most convenient. If you want to reach a directory further down the same branch as your current working directory, it’s easiest to use the relative path since it involves less typing. If you’re trying to get to a directory in a different branch, it might be more convenient to use the full path instead of navigating “backwards” and then forwards.
Over time, it will become easier for you to keep a mental note of the structure of the directories that you are using and how to quickly navigate amongst them. We will be using the same directory structure for this whole course so navigating it should get easier as you progress.
Relative path resolution
Using the file system diagram below, if pwd displays /home/csuser/cs_course/data/illumina_fastq, what will ls ../nano_fastq display?
Can you explain why?
Output
ERR5000342_sub12.fastqThe command ls .. moves us up a folder level before we list the contents of nano_fastq.
Part Three: Working with Files
Our data set: FASTQ files
Now that we know how to navigate around our directory structure, let’s start working with our sequencing files. We are looking at the results from a short-read sequencing experiment, which are stored in our illumina_fastq directory.
Wildcards
Navigate to your illumina_fastq directory:
Code
cd ~/Desktop/ybcmd/cs_course/data/illumina_fastqWe are interested in looking at the fastq files in this directory. We can list all files with the .fastq extension using the command:
Code
ls *.fastqOutput
ERR4998593_1.fastq ERR4998593_2.fastqThe * character is a special type of character called a wildcard, which can be used to represent any number of any type of character. Thus, *.fastq matches every file that ends with .fastq.
This command:
Code
ls ../../
ls *_2.fastq
Output
ERR4998593_2.fastqlists only the file that ends with _2.fastq.
This command:
Code
ls ~/Desktop/ybcmd/bin/*.shOutput
/c/Users/jpm513/Desktop/ybcmd/bin/colours_functions.sh*
/c/Users/jpm513/Desktop/ybcmd/bin/csguide.sh*
/c/Users/jpm513/Desktop/ybcmd/bin/csguideeditnprint.sh*
/c/Users/jpm513/Desktop/ybcmd/bin/textcolorsandstyles.sh*
Lists every file in /usr/bin that ends in the characters .sh. Note that the output displays full paths to files, since each result starts with /.
Exercise
What command would you use for each of the following tasks? Start from your current directory using a singlelscommand for each:
- List all of the files in
/binthat start with the letter ‘c’. - List all of the files in
/binthat contain the letter ‘a’. - List all of the files in
/binthat end with the letter ‘o’. - List all of the files in
/binthat contain the letter ‘a’ or the letter ‘c’.
Bonus: What would the output look like if a wildcard could not be matched? Try listing all files that start with ‘missing’.
Hint: Question 4 requires a Unix wildcard that we haven’t talked about yet. Try searching the internet for information about Unix wildcards to find what you need to solve the bonus problem.
ls ~/Desktop/ybcmd/bin/c*ls ~/Desktop/ybcmd/bin/*a*ls ~/Desktop/ybcmd/bin/*ols ~/Desktop/ybcmd/bin/*[ac]*
Bonus: ls: cannot access 'missing*': No such file or directory
Command History
If you want to repeat a command that you’ve run recently, you can access previous commands using the up arrow on your keyboard to go back to the most recent command. Likewise, the down arrow takes you forward in the command history.
You can also review your recent commands with the history command, by entering:
Code
historyto see a numbered list of recent commands. You can reuse one of these commands directly by referring to the number of that command.
For example, if your history looked like this:
Output
259  ls *
260  ls ~/Desktop/ybcmd/bin/*.sh
261  ls *R1*fastq
then you could repeat command #260 by entering:
Code
!260Type ! (exclamation point) and then the number of the command from your history. You will be glad you learned this when you need to re-run very complicated commands. For more information on advanced usage of history, read section 9.3 of Bash manual.
Examining Files — the less program
We now know how to switch directories, run programs, and look at the contents of directories, but how do we look at the contents of files?
One way to examine a file is to open the file in a read-only format and navigate through it using a program called less. The commands for navigating less are the same as the man program:
| key | action |
|---|---|
| Space | to go forward |
| b | to go backward |
| g | to go to the beginning |
| G | to go to the end |
| q | to quit |
Enter the following command from within the illumina_fastq directory:
Code
cd ~/Desktop/ybcmd/cs_course/data/illumina_fastq
less ERR4998593_1.fastq
FASTQ format
The contents might look a bit confusing. That’s because they are in FASTQ format, a popular way to store sequencing data in text-based format. These files contain both sequences and information about each sequence’s read accuracy.
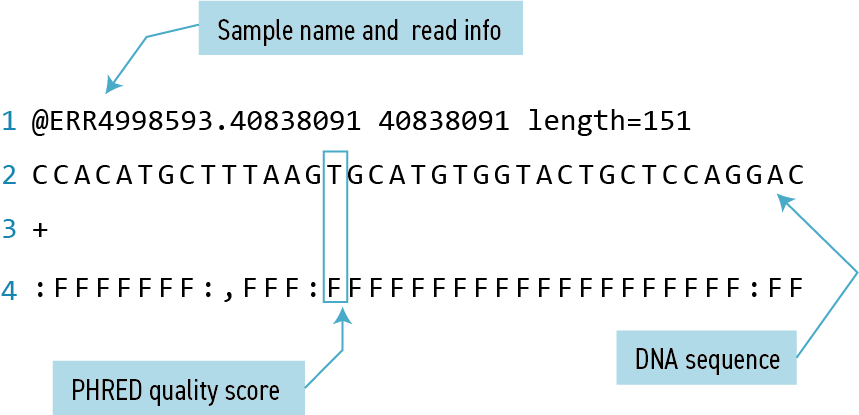
Each sequence is described in four lines:
| Line | Description |
|---|---|
| 1 | Always begins with ‘@’ and gives the sequence identifier and an optional description |
| 2 | The actual DNA sequence |
| 3 | Always begins with a ‘+’ and sometimes the same info in line 1 |
| 4 | Has a string of characters which represent the PHRED quality score for each of the bases in line 2; must have same number of characters as line 2 |
PHRED score
Quality encoding: !"#$%&'()*+,-./0123456789:;<=>?@ABCDEFGHIJ | | | | | Quality score: 01........11........21........31........41 Quality is interpreted as the probability of an incorrect base call. To make it possible to line up each individual nucleotide with its quality score, the numerical score is encoded by a single character. The quality score represents the probability that the corresponding nucleotide call is incorrect. It is a logarithmic scale so a quality score of 10 reflects a base call accuracy of 90%, but a quality score of 20 reflects a base call accuracy of 99%.
Exercise
- Open the
~/cs_course/data/illumina_fastq/ERR4998593_1.fastqfile inless. What is the last line of the file? (Hint: use the shortcuts above to speed things up)
Output
1. :FFFFFFFFFFFFFFFFFFFF:FFFFFFFFFFFFFFFF:FFFFFFFF,FFFFFFFFFFFFFFFFFFFFFFFFFF:FFFFF:FFF:FFFFFFFFFFFFFF:FFFFFF:FF:FFFFFFFFFFFFFFFFFFFFFF,F,FFF,FFFFFF,FFFFOther programs to look into files: cat, more, head, and tail
Another way to look at files is using the command cat. This command prints out the entire contents of the file to the console. In large files, like the ones we’re working with today, this can take a long time and should generally be avoided. For small files, it can be a useful tool.
The more command prints to the console only as much content of a file as it fits in the screen, and waits for you to press the space bar to print the following portion of the file likweise, and so on until either the last portion of the file is printed or you press the q key (for quit) to exit more.
There’s another final way that we can look at files, and in this case, just look at part of them. This can be particularly useful if we just want to see the beginning or end of the file, or see how it’s formatted.
The commands are head and tail and they let you look at the beginning and end of a file, respectively.
Code
head ERR4998593_1.fastqOutput
@ERR4998593.40838091 40838091 length=151 CCACATGCTTTAAGTGCATGTGGTACTGCTCCAGGACCAGCATTGTAGGTCGCCAATGCTTTGGCGTAGGTGCCATCAAACATATTCGTGTAATGAGCCATGAGATGGGCTGCTCCCTTCAATGCATCAACCGGATTCCACGGATCAATGC + :FFFFFFF:,FFF:FFFFFFFFFFFFFFFFFFFF:FFFF:FFFFFFFFFFF:FFFFFFFFF:FFFF:FFFFFFFFFFFFFFFFFFF:FFFF,FFFFFFF,FFF:FF,FFFFFFF::FF::FFFF:FFFFF:,:FFFFF,,FFFFFFFF,,F @ERR4998593.57624042 57624042 length=151 CCTTACCACACCGGGGCTGTGGCGTTCGACCCCATCGGCAAGGCACTCTGGGTTTCCGATAGCTCGCACCATCGGCTGCTGCGCGTCCGCAATCCGGACGGCTGGGAGAGCAAACTGCTCGTGGACACGGTCATCGGTCAGAAGGACAGGT + FFFFFFFFFFFFFFFFFFFFFFFFFFFFFFFFFFFFFFFFFFFFFFFFFFFFFFFFFFFFFFFFFFFFFFFFFFFFFFFFFFFFFFFFFFFFFFFFFFFFFFFFFFFFFFFFFFFFFFFFFFFFFFFFFFFFFFFFFFFFFFFFFFF:FFF @ERR4998593.3 3 length=151 GNGGTGCTCGACGGTGGCTCGGCGGATGCGCATGGCGTCGGGCCTGCGGTCCAGCCGCTCCCGCATGGCGTCGATCACCGCCTCATGCTCCCAGCGTTTGATGCGGCGCTCCTTGCCGCTCGTACACCGGCTCTTCAGCGGGCAGCCGGCGtaCode
tail ERR4998593_1.fastqOutput
+ FFF:F,FF:FFFFFF:F,:FFF,FF:FF,FFF::F:F,FF,FF,FFF,FFFFFF:FFFFFFF,F,,FFF:FFFF:,FFFF:FF::F:FFF,F:FFFF,:FFFFF,F:F:FF,FF:F:FFFF:FFF:FFF::FF:FF:,::FF,FF:,F,FF @ERR4998593.55595926 55595926 length=151 CAGTACAACGTTCGCTCCCTGAATTTCTGTTTCTCGGCCGGCGAAGCAATTGCTGTGGCTATCCAGGAGCGGTTCAAGCGGATGTTCGGCGTCGAAATTACGGAAGGCTGCGGGATGACCGAACTGCAAATTTACTCCATGAATCCGCCAT + FFFFFFFFFFFFFFFFFFFFFFFFFFFFFF:FFFFFFFFFFFFFFFFFFFFFFFFFFFFFFFFFFFFFFF:FFFFFFFFFFFFFFFFF:FFFFFFF:FF:FFFFFF:FFFFFFFFFFFFFFFFFFFFFFFFFFFFFFFFFFFFFFFFFFFF @ERR4998593.34263610 34263610 length=151 ACGCCCCACAGGGCGGCACCGACGCCGCCGCCCGGGCCCGCCGGCCCGCCCCGGTGGGCACCGGTTGCCACTGCGGCTTGCTCGGCCGTCTCACTCACTTGGACACACTTCCGTTCTTCACCGTCTCCACTGGCCGGCTAGACCGGTCCCG + FFFFFFFFF:FFFFFFFFFFFFFFFFFFFFFFFFFFFFFFFFFFFFFFFFFFFFFFFFFFFFFFFFFFFFFFFFFFFFFFFFFFFFFF,FFF,FFFF:FFFFFFFF,FFFFFF::F:F,FFFFFF,FFFFFFFFFFFFF,F:F:FF,FFFFThe -n option to either of these commands can be used to print the first or last n lines of a file.
Code
head -n 1 ERR4998593_1.fastqOutput
@ERR4998593.40838091 40838091 length=151Code
tail -n 1 ERR4998593_1.fastqOutput
F:FFFFFFFFFFFFFFFFFFFF:FFFFFFFFFFFFFFFF:FFFFFFFF,FFFFFFFFFFFFFFFFFFFFFFFFFF:FFFFF:FFF:FFFFFFFFFFFFFF:FFFFFF:FF:FFFFFFFFFFFFFFFFFFFFFF,F,FFF,FFFFFF,FFFFCreating, moving, copying, and removing files
Now we can move around in the file structure, look at files, and search files. But what if we want to copy files or move them around or get rid of them? Most of the time, you can do these sorts of file manipulations without the command line, but there will be some cases (like when you’re working with a remote computer like we are for this lesson) where it will be impossible. You’ll also find that you may be working with hundreds of files and want to do similar manipulations to all of those files. In cases like this, it’s much faster to do these operations at the command line.
We’ll continue looking at our large Illumina sequencing files for the next part of the lesson.
Copying Files
When working with computational data, it’s important to keep a safe copy of that data that can’t be accidentally overwritten or deleted. For this lesson, our raw data is our FASTQ files.
First, let’s make a copy of one of our FASTQ files using the cp command.
Navigate to the illumina_fastq directory and enter:
Code
cp ERR4998593_1.fastq ERR4998593_1_copy.fastq
ls -F
Output
ERR4998593_1.fastq ERR4998593_1_copy.fastq ERR4998593_2.fastqThe prompt will disappear for up to two minutes and reappear when the command is completed and the backup is made.
We now have two copies of the ERR4998593_1.fastq file, one of them named ERR4998593_1_copy.fastq. We’ll move this file to a new directory called backup where we’ll store our backup data files.
Creating Directories
The mkdir command is used to make a directory. Enter mkdirfollowed by a space, then the directory name you want to create:
Code
mkdir backupMoving / Renaming files and directories
We can now move our backup file to this directory. We can move files around using the command mv:
Code
mv ERR4998593_1_copy.fastq backup
ls backup
Output
ERR4998593_1_copy.fastqThe mv command is also how you rename files. Let’s rename this file to make it clear that this is a backup:
Code
cd backup
mv ERR4998593_1_copy.fastq ERR4998593_1_backup.fastq
ls
Output
ERR4998593_1_backup.fastqRemoving files and directories
You can delete or remove files with the rm command:
Code
rm ERR4998593_1_backup.fastqImportant: The rm command permanently removes the file. Be careful with this command. It doesn’t just nicely put the files in the recycling. They’re really gone.
By default, rm will not delete directories. You can tell rm to delete a directory using the -r (recursive) option. Let’s delete the backup directory we just made:
Code
cd ..
rm -r backup
This will delete not only the directory, but all files within the directory.
Exercise
Starting in the illumina_fastq directory, do the following:
- Make sure that you have deleted your backup directory and all files it contains.
- Create a backup of each of your FASTQ files using
cp. (Note: You’ll need to do this individually for each of the two FASTQ files. We haven’t learned yet how to do this with a wildcard.) - Use a wildcard to move all of your backup files to a new backup directory.
- It doesn’t make sense to keep our backup directory inside the directory it is backing up. What if we accidentally delete the
illumina_fastqdirectory? To fix this, move your new backup directory out ofillumina_fastqand into the parent folder,data.
Solution
rm -r backupcp ERR4998593_1.fastq ERR4998593_1_backup.fastqandcp ERR4998593_2.fastq ERR4998593_2_backup.fastqmkdir backupandmv *_backup.fastq backupmv backup ..ormv backup ~Desktop/ybcmd/cs_course/data/(note that you do not need to use the -r flag to move directories like you do when deleting them)
It’s always a good idea to check your work. Move to the data folder with cd .. and then list the contents of backup with ls -l backup. You should see something like:
Output
-rw-rw-r-- 1 csuser csuser 2811886584 Feb 22 11:25 ERR4998593_1_backup.fastq -rw-rw-r-- 1 csuser csuser 2302264784 Feb 22 11:29 ERR4998593_2_backup.fastqHere is what your file structure should look like at the end of this episode:
Searching files
We discussed in a previous episode how to search within a file using less. We can also search within files without even opening them, using grep. grep is a command-line utility for searching plain-text files for lines matching a specific set of characters (sometimes called a string) or a particular pattern (which can be specified using something called regular expressions). We’re not going to work with regular expressions in this lesson, and are instead going to specify the strings we are searching for. Let’s give it a try!
Nucleotide abbreviations
The four nucleotides that appear in DNA are abbreviated A, C, T and G. Unknown nucleotides are represented with the letter N. An N appearing in a sequencing file represents a position where the sequencing machine was not able to confidently determine the nucleotide in that position. You can think of an N as being aNy nucleotide at that position in the DNA sequence.
We’ll search for strings inside of our fastq files. Let’s first make sure we are in the correct directory:
Code
cd ~Desktop/ybcmd/cs_course/data/illumina_fastqHowever, suppose we want to see how many reads in our file have bad segments containing three or more unclassified nucleotides (N) in a row.
Determining quality
In this lesson, we’re going to be manually searching for strings of bases within our sequence results to illustrate some principles of file searching. It can be really useful to do this type of searching to get a feel for the quality of your sequencing results, however, in your research you will most likely use a bioinformatics tool that has a built-in program for filtering out low-quality reads. You’ll learn how to use one such tool in a later lesson.
To search files we use a new command called grep. The name “grep” comes from an abbreviation of global regular expression print.
Let’s search for the string NNN in the ERR4998593_1 file:
Code
grep N ERR4998593_1.fastqThis command returns quite a lot of output to the terminal. Every single line in the ERR4998593_1 file that contains at least one consecutive N is printed to the terminal, regardless of how long or short the file is.
We may be interested not only in the actual sequence which contains this string, but in the name (or identifier) of that sequence. Think back to the FASTQ format we discussed previously - if you need a reminder, you can click to reveal one below.

To get all of the information about each read, we will return the line immediately before each match and the two lines immediately after each match.
We can use the -B argument for grep to return a specific number of lines before each match. The -A argument returns a specific number of lines after each matching line. Here we want the line before and the two lines after each matching line, so we add -B1 -A2 to our grep command:
Code
grep -B1 -A2 N ERR4998593_1.fastqOne of the sets of lines returned by this command is:
Output
@ERR4998593.3 3 length=151
GNGGTGCTCGACGGTGGCTCGGCGGATGCGCATGGCGTCGGGCCTGCGGTCCAGCCGCTCCCGCATGGCGTCGATCACCGCCTCATGCTCCCAGCGTTTGATGCGGCGCTCCTTGCCGCTCGTACACCGGCTCTTCAGCGGGCAGCCGGCG
+
F#FFFFFFFFFFFFFFFFFFFFFFFFFFFFFFFFFFFFFFFFFFFFFFFFFFFFFFFFFFFFFFFFFFFFFFFF,FFFFFFFFFFFFFFFFFFFFFFFFFFFFFFFFFFFFFFFFFFFFFFFFFFFFFFFFFFFFFFFFFFFFFFFFFFFF
Exercise
Search for the sequence
AACCin theERR4998593_1.fastqfile. Have your search return all matching lines and the name (or identifier) for each sequence that contains a match. What is the output?Search for the sequence
CCGGTTin both FASTQ files. Have your search return all matching lines and the name (or identifier) for each sequence that contains a match. How many matching sequences do you get? (this may take up to 4 minutes to complete so be patient!)
grep -B1 AACC ERR4998593_1.fastq
Output
@ERR4998593.40838091 40838091 length=151
CCACATGCTTTAAGTGCATGTGGTACTGCTCCAGGACCAGCATTGTAGGTCGCCAATGCTTTGGCGTAGGTGCCATCAAACATATTCGTGTAATGAGCCATGAGATGGGCTGCTCCCTTCAATGCATCAACCGGATTCCACGGATCAATGC
--
@ERR4998593.34862640 34862640 length=151
CAGGCAGATTGCCGCCCGACACTTTCTTGGTCGGCGAAGAGTCGTCATTGCCAAGCCAGACTCCGGCGACCAGATAGCTCGTGTAGCCGAGGAACCAGGCGTCGCGCCAATCCTGGCTGGTCCCCGTTTTGCCCGCGGCCTGCCACCCCGG
--
@ERR4998593.63611176 63611176 length=151
GTTGTGGCCACTCGGGCGGGAAAACGTGTCGGTCGAGGAGGCTAACGAGATGGGTTATTCGGGCCTCGGCGTCCCGTCGTAGTCGCCGCCGCGAGCTAACCTACCGCGCCATGCCTGGGATGGGTGCTCGCCGCGCCCGGTCGGCCGGGAT
--
@ERR4998593.47948452 47948452 length=151
GTCCAGAGACAAACGACATCTGCTACGCGACGCAAAATCGACAGATGGCAGTACGTGAGCTAACCAAGATTGCCGATGTGATATTAGTTGTTGGGGCCAAAAACAGCTCGAATTCCAATCGGCTAAGAGAGATCGGCGAAGAGGCTGGCGT
--
@ERR4998593.44850488 44850488 length=151
TCTGATCTGCGGCTGGGCCATCACCTCCAAGGACGGCACCCCGATGAAGATGGGCGCATGGCCGGCCATGGCGCCGGAGACGGTGCGCTTCGTCGGCCAGGCGGTCGCGGTGGTGATCGCCGAGACCAAGAACCAGGCCAAGGACGCGGCC
--
@ERR4998593.67878655 67878655 length=151
CTCGTCGTCGGCGAGACATTCGCAGCGCGGATGACCGCCTACGACATCGCCGGCGACGGCGGCCTCTCGAACCGCCGCGTCTGGGCGGCGCTGCCGCAGGGCGCGGTGCCGGACGGCTGCTGCCTCGACGCCGAGGGCGCCATATGGGTGG
grep -B1 CCGGTT *.fastq
Output
ERR4998593_2.fastq-@ERR4998593.34862640 34862640 length=151
ERR4998593_2.fastq:CATCCGACCTTGATCCGGTTCCGTCGATCGCGCTTGGCTCCTCAGACGTGACGCCTCTGGAGATGGTATCGGCCTATGCGGCTTTCGCCAACGGCGGCCTGGGCGTCCAACCGCATGTGATCGCACGCGTGCGCACGGCGAACGGCAAGCA
--
ERR4998593_2.fastq-@ERR4998593.47948452 47948452 length=151
ERR4998593_2.fastq:CCTTCAGCTTTTGCTTGATGAGATAGGACCCGATCCGTCTTTCCTTGAAAAACGGCAATGCCATCGCTGTACTCCGGTTTGTAAAGATATCGCGCTGCGACGCGTGGTGATTTGGTTTCGGCGTTATCTGAGAGGAGTTAGATCTTAGAGC
--
ERR4998593_2.fastq-@ERR4998593.67878655 67878655 length=151
ERR4998593_2.fastq:CGGCAACCCCGCCCCAGGCACATCCACCTGCACCGCCTCGATGCGTCCGGTTCGGCTCGCGCGGCACTCTGCCGGGTCGGAGCTGGCGGCGGTGAGCAGGTAGAGGGTCCGGCGGTCGGCGCCGCCCAGCATGCAGGCATATACGCCCTGG
Redirecting output
grep allowed us to identify sequences in our FASTQ files that match a particular pattern. All of these sequences were printed to our terminal screen, but in order to work with these sequences and perform other operations on them, we will need to capture that output in some way.
We can do this with something called “redirection”. The idea is that we are taking what would ordinarily be printed to the terminal screen and redirecting it to another location. In our case, we want to print this information to a file so that we can look at it later and use other commands to analyse this data.
Redirecting output to a file — the > command
The command for redirecting output to a file is >.
Let’s try out this command and copy all the records (including all four lines of each record) in our FASTQ files that contain ‘NNN’ to another file called bad_reads.txt. The new flag --no-group-separator stops grep from putting a dashed line (–) between matches. The reason this is necessary will become apparent shortly.
Code
grep -B1 -A2 N --no-group-separator ERR4998593_1.fastq > bad_reads.txtThe prompt should sit there a little bit, and then it should look like nothing happened. But type ls. You should see a new file called bad_reads.txt.
You might be confused about why we’re naming our output file with a .txt extension. After all, it will be holding FASTQ formatted data that we’re extracting from our FASTQ files.
Won’t it also be a FASTQ file?
The answer is, yes - it will be a FASTQ file and it would make sense to name it with a .fastq extension.
However, using an extension such as .txt makes it easy to distinguish the files you may generate through some exploratory processing, as the one we just made with the grep program, from the original sequencing files of your project. So you can easily select all the files with a specific extension for further processing using the wildcard * character, for example: grep .. *.fastq or mv *.txt newlocation.
Counting number of lines in files — the wc program
We can check the number of lines in our new file using a command called wc. wc stands for word count. This command counts the number of words, lines, and characters in a file.
Code
wc bad_reads.txtOutput
20 78 4511 bad_reads.txtThis will tell us the number of lines, words and characters in the file. If we want only the number of lines, we can use the -l flag for lines.
Code
wc -l bad_reads.txtOutput
20 bad_reads.txtThe --no-group-separator flag used above prevents grep from adding unnecessary extra lines to the file which would alter the number of lines present.
Exercise
- How many sequences are there in
ERR4998593_1.fastq? Remember that every sequence is formed by four lines. - How many sequences in
ERR4998593_1.fastqcontain at least 5 consecutive Ns?
Code
wc -l ERR4998593_1.fastqOutput
64 ERR4998593_1.fastqNow you can divide this number by four to get the number of sequences in your fastq file (16).
Code
grep NNNNN ERR4998593_1.fastq > bad_reads.txt
wc -l bad_reads.txt
Output
0 bad_reads.txtThe command > redirects and overwrites
We might want to search multiple FASTQ files for sequences that match our search pattern. However, we need to be careful, because each time we use the > command to redirect output to a file, the new output will replace the output that was already present in the file. This is called “overwriting” and, just like you don’t want to overwrite your video recording of your kid’s first birthday party, you also want to avoid overwriting your data files.
Code
grep -B1 -A2 N --no-group-separator ERR4998593_1.fastq > bad_reads.txt wc -l bad_reads.txtOutput
20 bad_reads.txtCode
grep -B1 -A2 NNNNNNNNNN --no-group-separator ERR4998593_1.fastq > bad_reads.txt wc -l bad_reads.txtOutput
0 bad_reads.txtHere, the output of our second call to wc shows that we no longer have any lines in our bad_reads.txt file. This is because the second string we searched (NNNNNNNNNN) does not match any strings in the file. So our file was overwritten and is now empty.
The command >> redirects and appends
We can avoid overwriting our files by using the command >>. >> is known as the “append redirect” and will append new output to the end of a file, rather than overwriting it.
Code
grep -B1 -A2 N --no-group-separator ERR4998593_1.fastq > bad_reads.txt wc -l bad_reads.txtOutput
20 bad_reads.txtCode
grep -B1 -A2 NNNNNNNNNN --no-group-separator ERR4998593_1.fastq >> bad_reads.txt wc -l bad_reads.txtOutput
52 bad_reads.txtThe output of our second call to wc shows that we have not overwritten our original data.
Redirecting output as input to other program — the pipe | command
Since we might have multiple different criteria we want to search for, creating a new output file each time has the potential to clutter up our workspace. We also thus far haven’t been interested in the actual contents of those files, only in the number of reads that we’ve found. We created the files to store the reads and then counted the lines in the file to see how many reads matched our criteria. There’s a way to do this, however, that doesn’t require us to create these intermediate files - the pipe command (|).
This is probably not a key on your keyboard you use very much, so let’s all take a minute to find that key. For the standard QWERTY keyboard layout, the | character can be found using the key combination
- Shift+\
What | does is take the output that is scrolling by on the terminal and uses that output as input to another command. When our output was scrolling by, we might have wished we could slow it down and look at it, like we can with less. Well it turns out that we can! We can redirect our output from our grep call through the less command.
Code
grep -B1 -A2 N ERR4998593_1.fastq | lessWe can now see the output from our grep call within the less interface. We can use the up and down arrows to scroll through the output and use q to exit less.
If we don’t want to create a file before counting lines of output from our grep search, we could directly pipe the output of the grep search to the command wc -l. This can be helpful for investigating your output if you are not sure you would like to save it to a file.
Code
grep -B1 -A2 N --no-group-separator ERR4998593_1.fastq | wc -lOutput
20Custom grep control
Use man grep to read more about other options to customize the output of grep including extended options, anchoring characters, and much more.
Redirecting output is often not intuitive, and can take some time to get used to. Once you’re comfortable with redirection, however, you’ll be able to combine any number of commands to do all sorts of exciting things with your data!
We’ll be using the redirect > and pipe | later in the course as part of our analysis workflow, so you will get lots of practice using them.
None of the command line programs we’ve been learning do anything all that impressive on their own, but when you start chaining them together, you can do some really powerful things very efficiently.